Build Raspberry Pi - GPS Device
Step-by-step instructions for building a GPS module and sending the coordinates to a server

I like to walk Garf, my sister’s dog. The problem is he can get away real quick. What if he gets lost? With Garf, the pet tracker with a GPS collar and a mobile app, I’ll always be able to keep an eye on him!
Let’s build it! This step-by-step guide is designed to be an easy-to-follow, one-stop-shop for setup, questions, and troubleshooting for receiving and sending GPS data from a Raspberry Pi.
What’s a Raspberry Pi?
It’s a small headless (without screen) computer created by a non-profit, The Raspberry Pi Foundation, to promote teaching of basic computer science. The Pi was designed to be affordable for schools in all countries. The latest model, the Pi 3 B+, is currently priced at $40. Due to the Pi’s low cost, size, versatility, and ease-of-use, it’s been heavily utilized in many IoT and robotics applications.
Why the name Raspberry Pi?
From Eben Upton, the founder of the Pi Foundation…
The Raspberry is a reference to a fruit naming tradition in microcomputers. (think Tangerine, Acorn, Apricot, Blackberry, Apple) The Pi is a reference to Python, originally the only coding language to be used on the device.
Build Checklist
Essential
- Raspberry Pi 3 B+
- Monitor + HDMI + lightening port adapter (Mac)
or ethernet + USB adapter (Mac) + SD Card Reader
or USB Drive > 8 GB - NEO 6M GPS module
- 4 Female-to-Male wires*
- Patience!
*included with some CanaKits
Helpful
Build Steps
1 - Install OS
2 - Connect to Pi
3 - Connect GPS
4 - Parse Data
Step 1 - Install OS
pi@raspberrypi:~ $ cat /etc/os-release
PRETTY_NAME="Raspbian GNU/Linux 9 (stretch)"
NAME="Raspbian GNU/Linux"
VERSION_ID="9"
VERSION="9 (stretch)"
ID=raspbian
ID_LIKE=debian
HOME_URL="http://www.raspbian.org/"
SUPPORT_URL="http://www.raspbian.org/RaspbianForums"
BUG_REPORT_URL="http://www.raspbian.org/RaspbianBugs"
After hastily tearing apart the box like a kid on Christmas, make sure to protect the Pi by sticking on the cooling waffles and snapping on the plastic case!
If you have access to a monitor with HDMI connection, an SD Card preloaded with NOOBS (New Out Of Box Software) is the easiest way to install the OS. NOOBS comes with Canakits or it can purchased separately. (Option A)
If you don’t have a monitor or want to install the OS headless, a blank SD Card or blank USB is preferred. (Option C)
But you can manually configure NOOBS to be installed headless. (Option B)
Option A: NOOBS SD Card and a monitor
Insert the SD Card into the bottom of the Pi and plug into power source! Plug in external moniter(HDMI port), keyboard(USB port), and mouse. Select the Raspbian operating system from the list (Raspbian, LibreELEC, OSMC, Recalbox, Lakka, RISC OS, Screenly OSE, Windows 10 IoT Core, TLXOS). That was easy!
Option B: NOOBS SD Card and no monitor
Insert NOOBS SD Card into SD Card Reader into computer.
We are going to go into the /images to delete all the compressed os image files except for Raspbian. Raspbian will be installed by default on boot without seeking user input. Ok let’s do it…
In the OS folder on the SD card with NOOBS, delete all folders except Raspbian (folders Arch, RaspBMC, Pidora, OpenELEC, RISCOS, and datapartition for NOOBS 1.3.7. And only Data_Partition for NOOBS 1.3.10). (depending on NOOBS version)
Edit file recovery.cmdline (in SD card root folder) to append silentinstall to the arguments list.
After (depending on NOOBS version):
runinstaller quiet vt.cur_default=1 coherent_pool=6M elevator=deadline silentinstallNow the Pi should auto install Raspian OS, but wait!
SSH connections are blocked by default for security reasons!
In order to change the settings we have to create a file titled ssh.
Search for /boot/ on SD Card…
Create 2 files:
touch /Volumes/boot/ssh
touch /Volumes/boot/wpa_supplicant.conf
or could look like this…
cd /media/{your-username}/boot
touch ssh
If you do not have a ethernet cord + USB adapter, you will need to add the wpa config file or edit the existing one to automagically connect your Pi to your wireless network on boot
touch wpa_supplicant.conf
nano wpa_supplicant.conf
Add your network id to ssid and your network password to psk to the code block below and add to wpa_supplicant.config.
ctrl_interface=DIR=/var/run/wpa_supplicant GROUP=netdev
update_config=1
country=US

network={
    ssid="myssid"
    scan_ssid=1
    psk="mypass"
    key_mgmt=WPA-PSK
}
To exit nano, type Ctrl + X, Y to save.
Now you are finally ready to eat some pie! Alright eject SD Card and insert into Pi. Install could take up to 30 minutes by some accounts. Maybe grab lunch, pie sounds good!
If you see a green button blinking on the Pi next to the red button, you should be connected to the internet. Hallelujah!
Option C: Blank SD Card or USB Drive
Download the image from the Raspberry Pi website Downloads page.
Download Etcher and install it.
If you’re not using Etcher, you’ll need a special unzipper like The Unarchiver (Mac) to extract the image file becasue the file is over 4GB in ZIPG4 format.
Write the OS image zip to an SD Card or USB with Etcher:
- Connect an SD card reader with SD card or insert USB.
- Open Etcher and select the Raspberry Pi
.imgor.zipfile. - Select the SD card or USB and click ‘Flash!’
- Eject SD card or USB and reinsert into computer
- Follow the earlier instructions to enable SSH
SSH connections are blocked by default for security reasons!
Please find the earlier instructions about adding ssh file to /boot/
If you do not have a ethernet cord + USB adapter, you will need to add the wpa config file or edit the existing one to automagically connect your Pi to your wireless network on boot
Please find the earlier instructions on how to add a wpa config file.
Step 2 - Connect to Pi
Option A: Ethernet
Connect Pi to ethernet cord, ethernet to USB adapter, and adapter to a Mac USB port.
Change the internet sharing settings on your Mac to allow sharing with Pi.
picture of share screen
Follow wireless instructions below.
Option B: Wireless
Create an SSH (Secure Shell).
In terminal:
ssh pi@raspberrypi.localIf you renamed the hostname of your Pi, type ssh yourusername@yournewhostname.local
The default password is raspberry to connect the device.
If logged in, jump to Raspi-Config.
Troubleshooting SSH
If you can’t create SSH, try to ping the Pi. This should send back to you the Pi’s IP address.
ping raspberrypi.localIf you renamed the hostname of your Pi, type ping yourusername@yournewhostname.local
If you can’t ping the Pi, you might have a connection problem or the wrong hostname.
The easiest way to check is by logging into your router.
Get router IP.
netstat -rn |grep defaultCopy and paste the router IP starting with 192. into Chrome. Go to Modem Status -> Device Table. (varies depending on router setup) The device table shows all connected devices and their IP addresses. Find Pi and copy and paste the IP into the terminal.
ssh pi@192.168.X.XYou might a receive this warning.
The authenticity of host '192.168.X.X (192.168.X.X)' can't be established.
ECDSA key fingerprint is SHA256:Pr0qOIDe2E+oPqXUqBHoCqg8bHwYuSAyC3tW6MICCYM.
Are you sure you want to continue connecting (yes/no)?
Type yes, press Enter.
If you do not see your Pi in the device table, see Step 1 - Installing OS to add ssh file and wpa config file to /boot/ or see Option A: Ethernet.
If you can’t login to router, you can use nmap.
The nmap command (Network Mapper) is a free and open-source tool for network discovery, available for Linux, macOS, and Windows.
apt-get install nmap
hostname -I //returns your IP (192.168.X.X)
nmap -sn 192.168.X.X/24
Copy Pi’s IP and paste into:
ssh pi@192.168.X.XIf you want to fancy…
(sudo nmap -p 22 --open -sV 192.168.0.0/24 | grep 192 | awk '{print $NF}') && ssh pi@$IPWe are in! Sweet baby Jesus!
Raspi-Config
As long as SSH is enabled on the Pi, someone else could access your Pi. It’s not required to change the default password, but each time you start the Pi with the default password you will receive a warning.
Change the password.
passwdPi 3 comes with Bluetooth which by default is setup on the serial port which we’ll be connecting to. If there’s a way to connect the GPS without disabling the bluetooth, please advise me.
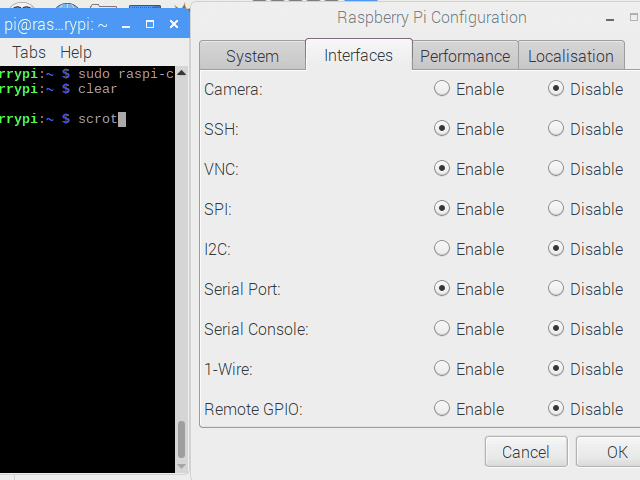
Verify SSH, Serial Port settings.
sudo raspi-configMake sure SSH, VNC, SPI are enabled. Switch the serial console off, but keep the serial port on.
Update.
sudo apt-get update
sudo apt-get dist-upgrade
sudo apt-get install -y
sudo reboot
Step 3 - Connect GPS
Verify the cmdline.txt file.
cat /boot/cmdline.txtThere should be no console=serial0
The serial0 is the serial port we need to use for the GPS.
Now we need to modify the /boot/config.txt to enable UART and disable the bluetooth.
nano /boot/config.txtPaste the following into the bottom:
dtoverlay=pi3-disable-bt
core_freq=250
enable_uart=1
force_turbo=1
Ctrl+X to exit, press Y to save
sudo rebootThe final step is enable the getty service for ttyAMA0 or serial0. I’m not sure the reason why this must be done. I want my script to be the only thing accessing the port, but without enabling the getty my script doesn’t work.
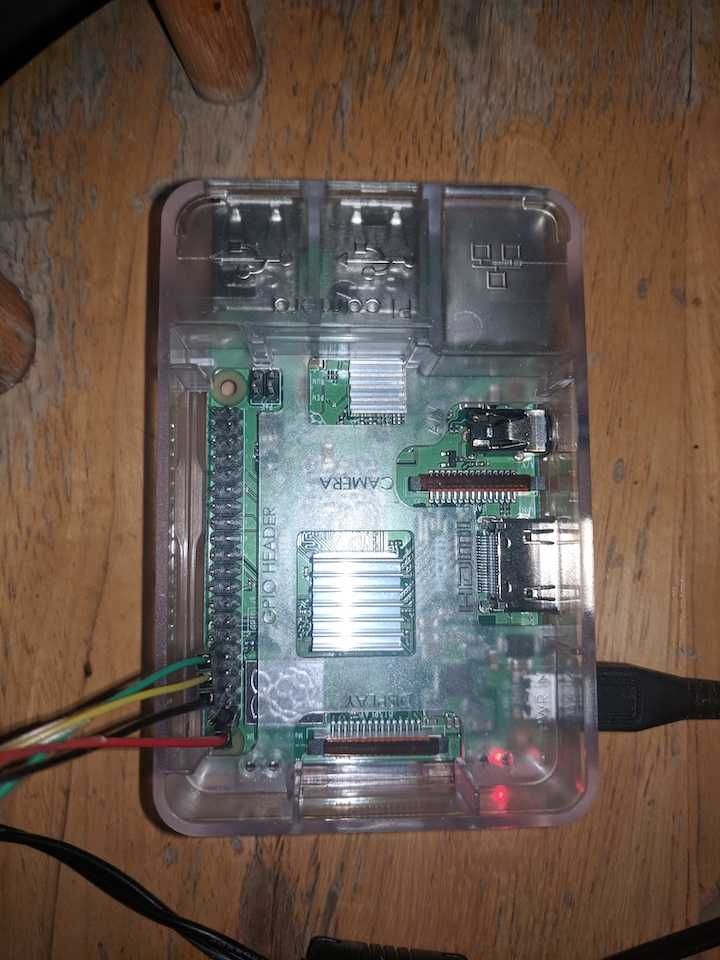
Connect the device using pins.
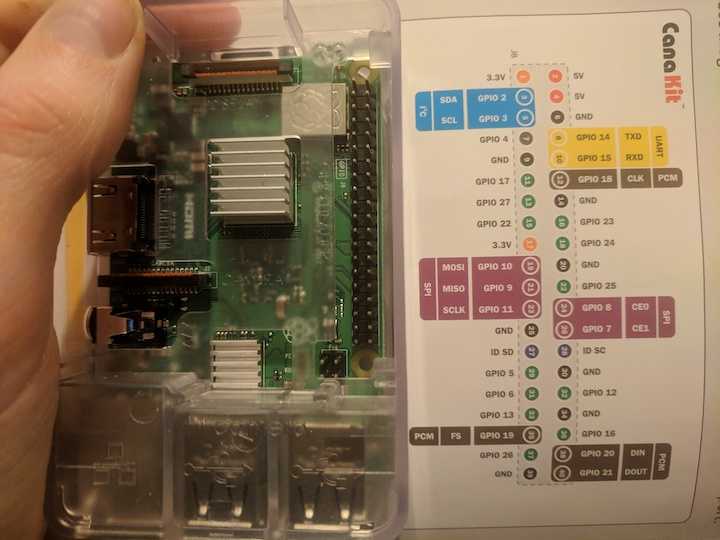
VCC to Pin 1, which is 3.3v
TX to Pin 10, which is RX (GPIO15)
RX to Pin 8, which is TX (GPIO14)
Gnd to Pin 6, which is Gnd
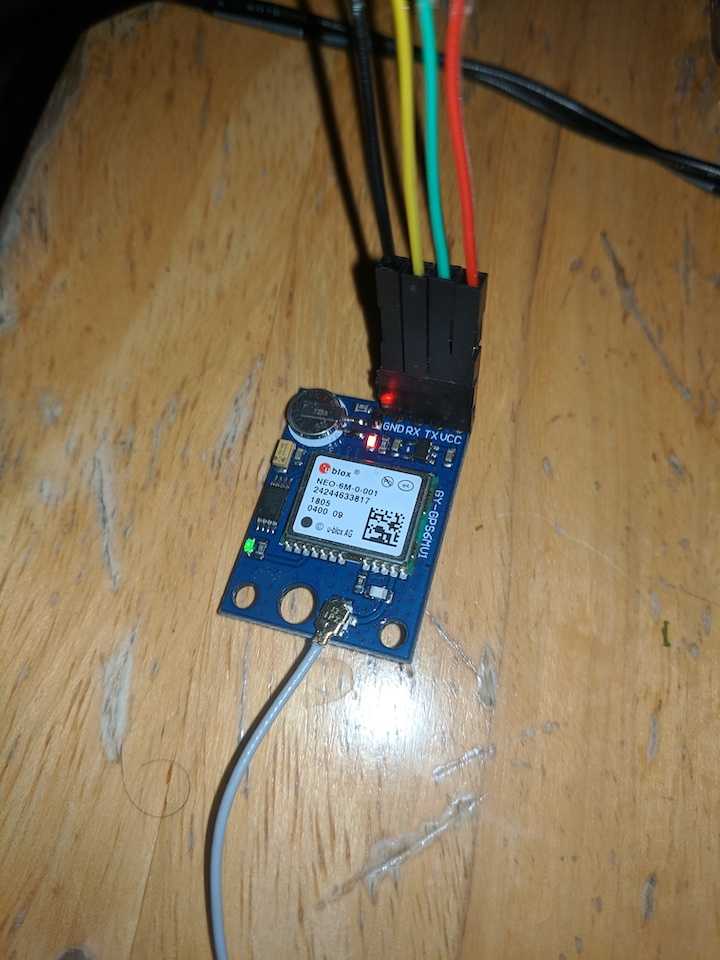
The red light on the GPS lights up when receiving power, and the green light blinks when receiving a satellite signal.
Console log the stream of data.
sudo cat /dev/serial0If nothing happens, press control + C to exit.
Enable the getty-service.
sudo systemctl enable serial-getty@ttyAMA0.serviceCat either port.
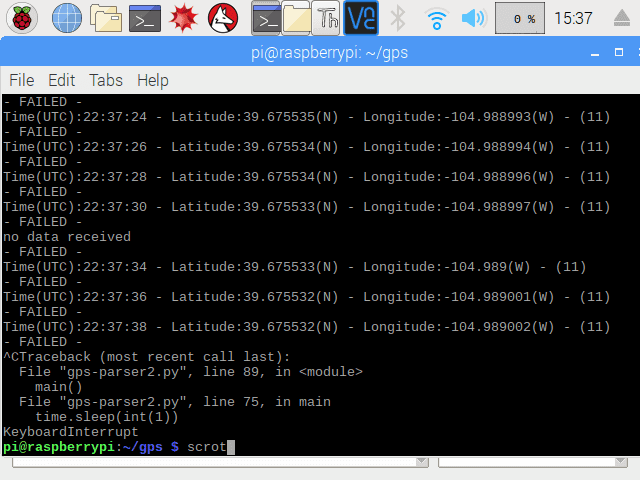
sudo cat /dev/ttyAMA0If you get back a response like the picture below, your GPS cannot get a fix. Try placing the Pi next to a window or on a porch.

You want to get a response like the one below.

Hooray! You are getting good data. What is it?
The console is logging NMEA sentences. What are those?
They all return different data, but we only need either the GPGGA or the GPRMC to get the latitude and the longitude. If we wanted the velocity and directional data, we would use the GPRMC.
We’ll run a script to parse the data.
Step 4 - Parse Data
Let’s Git set up!
Enter username.
git config --global user.name "YOUR_USERNAME"
git config --global user.name
Enter email.
git config --global user.email "email@example.com"
git config --global user.email
Verify setup.
git config --global --listCreate directory.
mkdir gps
cd gps
touch gps-parser.py
nano gps-parser.py
Copy and paste script below into gps-parser.py file.
def decode(coord):
    v = coord.split(".")
    head = v[0]
    tail =  v[1]
    deg = head[0:-2]
    min = head[-2:]
    totalmin = min + "." + tail
    percentdeg = round((float(totalmin) / 60), 6)
    degnum = float(deg)
    totaldeg = degnum + percentdeg
    totaldegstr = str(totaldeg)
    return totaldegstr

def getLoc():

    port = "/dev/serial0"
    ser = serial.Serial(port, baudrate = 9600, timeout=1)
    location = 0

    while location == 0:
        try:
            data = ser.readline()
        except:
            print "no data received"
            return
        for line in data.split('\n'):
            if line.startswith( '$GPGGA' ):
                location = 1
                s = line.split(",")
                if (len(s) < 7):
                    print "no satellite data available"
                    return
                if (s[7] == '0') or (s[7] == ""):
                    print "no satellite data available"
                    return
                time = s[1][0:2] + ":" + s[1][2:4] + ":" + s[1][4:6]
                lat = decode(s[2])
                dirLat = s[3]
                global negLat
                negLat = lat
                if dirLat == "S":
                    negLat = "-" + lat
                lon = decode(s[4])
                dirLon = s[5]
                global negLon
                negLon = lon
                if dirLon == "W":
                    negLon = "-" + lon
                sat = s[7]
                try:
                    print "Time(UTC):%s - Latitude:%s(%s) - Longitude:%s(%s) - (%s)" %(time, negLat, dirLat, negLon, dirLon, sat)
                    return
                except:
                    print "no lat or long"
                    return

def main():

    name = ""
    key = ""

    print 'Initiating...'

    baseURL = 'https://api.thingspeak.com/update?api_key=%s' % key

    while True:
        time.sleep(int(1))
        getLoc()
        try:
            f = urllib2.urlopen(baseURL +
                                    "&field1=%s&field2=%s&field3=%s" % (name, negLat, negLon))
            print "- SENT -"
            f.close()
        except:
            print "- FAILED TO SEND -"


#Call main
if __name__ == '__main__':
    main()
Run the script.
python gps-parser.pyTerminal should log the following.
If you get a script error, it might be due to indentation.
If you get no satelite data received, there might be another operation running on the port.
Grep the port.
ps aux | grep serial0Or.
ps -ef | grep serial0Grab the operation id (the first number in line) from the operation you wish to stop, and insert in place of id-number below to stop the action.
sudo kill id-numberScript Logic
We created an infinite loop using while True because we want the script to run forever. We made the function getLoc() to run another infinite loop to keep checking the serial port for valid data. We created two separate loops for more control over the timing. We added a buffer using time.sleep() before calling getLoc(). If data is being received by ser.readline(), we’ll scan the line starting with GPGGA for the latitude and longitude. If there are coordinates, we’ll send them to decode(). We’ll log the result to the console along with the number of satellites pinged. And finally we’ll send the new coordinates to our server and log the result.
You are missing the api key and name for your api call. Go to ThingSpeak, a free api that stores data in JSON, to create a profile. Follow the instructions and create a channel. Add your name and api key in the script, and the coordinates will send to your channel.
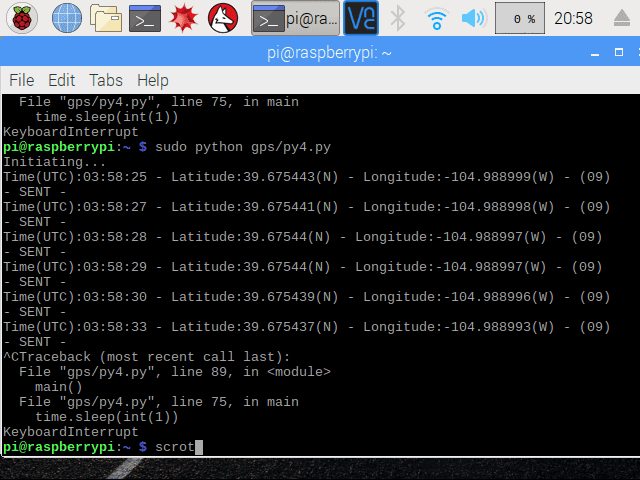
Run the script, and the terminal should log the following.
You can access the data stored in ThingSpeak from anywhere. Or you could write your own script using another language, request library, database, api, or server. The only limiting factor is Wifi, but Pi’s can connect to a cellular network! Future blog post?
Create remote, add, commit, push.
git init
git add .
git commit '1st parser'
git remote add origin https://github.com/user/repo.git
git push origin master
Run script.
sudo python gps-parser.pyYou return should look like below.
HIGH FIVE! You’ve accomplished the impossible!
An easier way to write code is with IDE through the Pi’s GUI or using a Web IDE. To access the Pi’s GUI, use VNC Viewer.
VNC Viewer
With VNC you can cloud connect to view the Pi’s GUI from any network without messing with IP addresses.
-
Download in Pi terminal.
sudo apt-get update sudo apt-get install realvnc-vnc-server realvnc-vnc-viewer -
Sign up for a RealVNC account. RealVNC’s cloud service is free for educational or non-commercial purposes.
-
On Pi, sign in to VNC Server using your new RealVNC account credentials.
-
Download RealVNC app on computer or phone. Download RealVNC app.
-
Sign in to VNC Viewer using the same RealVNC account credentials.
IDE’s
-
Thonny, a Python IDE, comes already installed on RaspbianOS. Viewing the Pi’s GUI, you can run Thonny from terminal with the following command.
thonny -
ADAfruit’s Web IDE runs headless in any Chrome or Firefox browser connected to the same network, and provides dark theme with sytnax highlighting for Python, Ruby, and Javascritpt.
-
Mu, a Python IDE released in 2018, looks cool!
-
VS Code and Atom have 3rd party builds for Pi.
-
Geany supports tons of programming languages like C, C++, C#, Java, HTML, PHP, Python, Perl, Ruby, Erlang and even LaTeX.
Stay tuned for Part II which will cover building the mobile application!
Happy Coding!